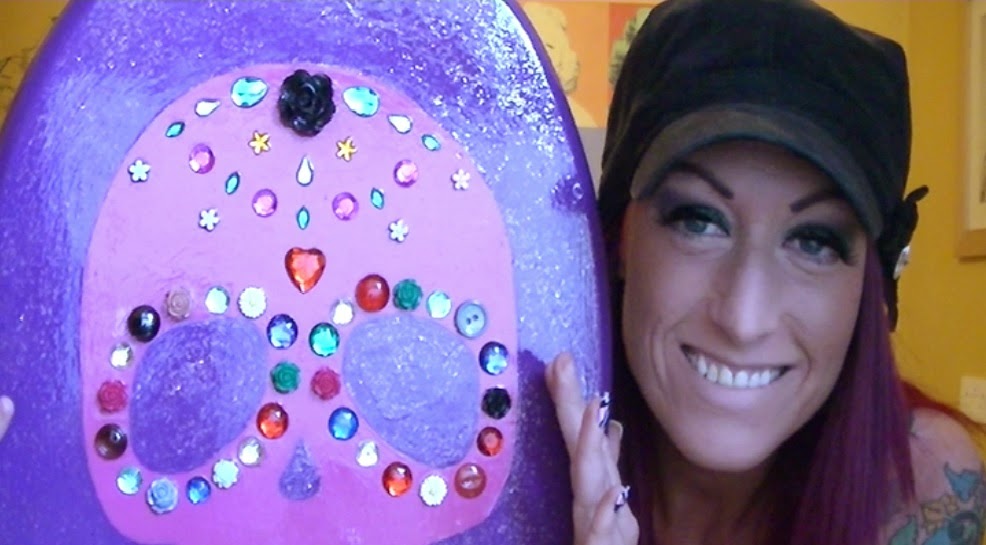
I am absolutely loving all things Day of the Dead at the moment and so a few of my latest projects have had this theme, this project, however is one of my craziest to date so I thought I’d share it with you.
For full video instruction visit: DIY Sugar Skull Toilet Seat Upcycle
Things you will need:
- Wooden toilet seat (you can buy these for about £10 but mine was my existing wooden toilet seat & I have already painted it once before)
- Paint – I use emulsion tester pots coz they come in a vast array of colours and they are soooo cheap, but if you have access or ‘fundage’ for better paints- then go for it!
- Exterior Varnish – This is important because it needs to be able to withstand damp when it goes to live in the bathroom, again I already had some in the cupboard.
- Various beads, gems, resin flower, buttons, stones, jewels etc for decoration – use your imagination.
- Sandpaper – just use whatever grade you have handy.
- Strong glue, I used the E-6000 Glue I use for jewellery making
- Glitter Paint (optional) I had some of this already left over from another project so I used it but it would have still looked fabulous without it.
I had all of this stuff in my art cupboard already; the only money I had to
spend was £1 on a new purple tester pot because I had run out. So this has got
to be the cheapest up-cycle to date!
STEP ONE:
If you are using an old toilet seat then remove it, clean it
thoroughly & let it dry overnight. Then sand it. I used Wilkinson’s own
medium sandpaper because this is what I already had in the cupboard; it’s only
to sand a toilet seat so there’s no need to go spending extra cash. Once sanded
remove dust with a damp cloth and leave to dry again.
STEP TWO:
First step was to paint the seat purple all over, top and
bottom, this takes a while because you’ve got to leave time to dry between
coats and you have to let the first side dry completely before it’s safe to
turn it over and paint the other side. I did two coats of purple each side in
Wilkinson’s own emulsion tester pot in ‘Wizard’ - £1.
STEP THREE:
Before I could paint the lid I had to draw my skulls outline
in pencil, I had already done a sketch of my idea so I thought it wouldn’t be
so difficult. It was way harder than I thought it was going to be because it
needed to be symmetrical. I drew straight onto the seat with pencil and I
rubbed it out and started again about ten times so you definitely need an
eraser handy! If I did it again I would fold a piece of A4 paper lengthways paper,
and draw half my skull, cut it out and open it to reveal a full skull, which I
would then use as a template, so you might want to do it that way.
STEP FOUR:
Paint purple around skull, in middle of eyes, nose etc and
leave to dry. Do two coats, let it dry fully then turn it over and paint the
underside with two coats too. Leave everything to dry again.
STEP FIVE:
Paint the skull in bright pink. I used Wilkinson’s emulsion
tester pot in ‘Hot Gossip’. Give it two coats and leave to dry.
STEP SIX:
This step is optional but I had some old glitter paint left
from another project so I gave all the purple parts of the seat a coat of gold
glitter, leaving only the pink skull plain. I used Homebase Paint Effects in
Gold.
STEP SEVEN:
This is the fun part, once everything is dry, get out all those beads & buttons I
mentioned earlier and arrange them on your skull in a funky Day of the Dead,
Sugar Skull type style.
If you’re looking for inspiration you can follow my ‘Mexican
Folk Art’ board on Pinterest.
STEP EIGHT:
You’re going to need strong glue for this I used E-600 which
I got off eBay for £2.99. It’s really strong stuff though so make sure any
little furry creatures are well out of the way and the windows are open. Follow
the instructions on the glue and stick all your pretty gems and jewels down and
leave in a safe place to dry.
STEP NINE:
This is another time consuming part as all of the toilet
seat needs varnishing now. It’s really important you use varnish that
withstands damp so I used Wilkinson’s Exterior Clear Varnish which cost £8.99
but I already had some left over from another project. There was 24 hours
drying time between coats and longer for it to be completely dry so this did
take place over a few days as I did 3 coats all over. My tip for varnishing is
to do the thinnest coat possible every time and do 3 coats instead of just two;
this should make sure my toilet seat is functional as well as pretty!
So there you have it! How to make a Sugar Skull Toilet Seat
for next to nothing!
If you got this far thanks so much for reading, please leave
comments and let me know if you make one, I would love to see it, full video
instruction is available on my youtube channel: INSERT LINK and other things
made by me can be seen in my Etsy shop INSERT LINK. I am taking commissions if
anyone out there wants something similar but doesn’t want to make their own you
can email me on www.abidashery@gmail .com or contact me via Etsy.
Thanks for reading. I hope enjoyed this as much as I did. Full video instructions at: DIY Sugar Skull Toilet Seat Upcycle

.jpg)


No comments:
Post a Comment